🏋️♂️ Elevate Your Workout Game with YOLEO!
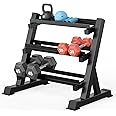
The YOLEO 1100LBS Dumbbell Rack is a heavy-duty, adjustable 3-tier weight storage solution designed for home gyms. With a maximum weight capacity of 1100 lbs, it features customizable width settings, a compact design for easy access, and rubber end caps for floor protection. Assembly is straightforward, making it an ideal choice for fitness enthusiasts looking to optimize their workout space.
| Color | BLACK |
| Style | Adjustable |
| Material Type | Alloy Steel |
| Batteries Included? | No |
| Brand | YOLEO |
| maximum weight capacity | 1100 Pounds |
| Manufacturer | YOLEO |
| Item model number | YOLEO001 |
| Product Dimensions | 50 x 96 x 93 cm; 16.3 kg |
| ASIN | B08VN4F2GJ |
A**R
Good quality
Strong and sturdy, easy to assemble, Very good quality and very happy
V**
Ottima.
Il rack si può regolare a seconda della tipologia dei manubri.
P**F
Preis/Leistung ist Top
Ich war bei dem Pries Anfangs etwas skeptisch aber zu unrecht.Für meine bis 20Kg Hanteln ist der Ständer perfekt und nimmt nicht zuviel Platz ein.Nur die 30Kg KH Hanteln stelle ich da nicht rein.Würde ich wieder kaufen.
D**O
Good product, light on instructions, here's a few tips!
Overall, this rack is everything I'd hoped for from the purchase, but there were zero instructions or other useful info included. There was a diagram and a list of parts, but it wasn't very useful. There was a wrench included of which the 17mm end fit well for the heads of the bolts, but was a bit too large for the nuts. The nuts seemed to call for a 16mm wrench, which was not included, and I have no idea what the 14mm end of the wrench is intended for. I found that a small adjustable crescent wrench worked fine to tighten the nut while holding the head of the bolt with the included 17mm. Read on if you want a couple of specific assembly tips drawn from my experience.To start, I bought this particular rack for a couple of reasons... I was trying to fit a pretty tight space and would have gone with something 30" if it existed. 24" wouldn't hold enough weights for my needs and most of the 36" rack I found measure 36" between the insides, so were actually more like 39"-40" footprint. This one is 36" end to end (around 32 1/2" inside) so it better suited to my need.First tip: Don't wear light colored clothing when assembling! There are some manufacturing oils on all the parts that will tend to rub off on your hands, cloths, rugs, etc. when working with them. I recommend wiping down the main parts using a cloth with a mild cleaner before starting. Probably not needed for the bolts if you're careful.Second tip, when putting the rubber feet on, put them on starting on the 'side' of the foot rather than top or bottom. I found it went on much easier and I was able to get it over the other side more successfully than trying from the top or bottom or bottom to top. It will still take some wiggling to get it all the way on once you get it over all four edges of the square tubing.When putting on the angled cross pieces, start at the bottom, front and back, then work your way up. Drop the bolts in from the top, twist on the nuts and initially, just tighten them finger tight... you'll probably need the looseness in the overall structure as you try to line up the other bolts and holes. There are no lock washers included, and I considered the idea of adding them, but decided it wasn't necessary because once assembled, I have no intention of moving it again! For hex or all steel dumbbells, use the outer bolt slot for the front rail. I assume the inner bolt hole is better suited for the vinyl clad dumbbells, but don't quote me!I found that putting in the top row rails required some muscle to pull the sides apart far enough to slip the bolts in. I don't know if every assembly will have the same challenge... it's definitely caused by loose tolerance in manufacturing, but not insurmountable. I considered cutting a 2x4 to the perfect length to wedge between the top of the side pieces, but after some 'finesse' I was able to get the rails mounted without having to do that.Finally, tighten down the bolts. It's a good idea to check the spacing between the front and back rails based on the dumbbells you're putting on them before tightening. I found that I have a slight angle from one side to the other as the weight become smaller (lower weight). No biggie here, it's easy enough to loosen and slide the rail later, but it's worth mentioning if you want a one shot assembly.One other thing you might notice/consider... you'll see in my photo that I built a shelf for the top row of the rack. As mentioned at the top, I could have gotten away with a slightly smaller rack, but once I had everything assembled and loaded up, it was clear I could stage all the dumbbells on the bottom two levels, so I built a quick shelf from some scrap lumber I had on hand and couldn't be happier to have the shelf to use for some accessory items. Previously, I had stuff on the floor and strewn around here and there, so this turned out to be an awesome modification.In summary, nice rack, good price, weak instructions, be creative!
J**R
Great rack!
Easy to put together and adjust for different sized dumbbells. Good quality, heavy, sturdy, and looks like a real piece of “gym” equipment. Great find, I must say!
Trustpilot
3 weeks ago
1 month ago